The world of analytics has undergone significant transformation since the major migration to Google Analytics 4 back in 2023. What started as a challenging transition for many has now evolved into a new norm. Over time, even the harshest critics—those who found the platform confusing or overwhelming—have grown more comfortable and adapted to its features and capabilities.
As we move into 2025, we aim to guide you through a more thorough and practical approach to setting up Google Analytics 4. Whether you're starting fresh or looking to refine your setup, this guide is designed to simplify the process while ensuring everything is configured properly. Additionally, we’ve included a bonus section on auditing your GA4 implementation to help you optimize performance and troubleshoot potential gaps.
So, instead of veering away from the basics, let’s take a step back, refine our approach, and ensure your analytics setup is working as effectively as possible.
This 2025: How Does GA4 Compare to Legacy UA: Is It Really Better?
This question is somewhat subjective and largely depends on how we perceive the tool and what our expectations are. While opinions may vary, one thing is clear: Google Analytics 4 is not just an upgrade from Universal Analytics—it’s a completely re-engineered system that redefines fundamental concepts like users and sessions.
We’ve outlined a few reasons why we believe GA4 is a significant improvement, but it’s worth noting that Google has always been attentive to user feedback, continuously striving to enhance the platform. That said, it’s important to understand that comparing GA4 to Universal Analytics isn’t entirely fair since they’re built on completely different technologies.
While GA4’s reporting modules still leave room for improvement, it surpasses Universal Analytics in several critical areas:
- Measuring users across devices and channels for a more cohesive understanding of customer journeys
- Providing enhanced measurement insights through machine learning and access to unsampled data
- Using analytics intelligence to predict customer behavior and inform strategic decisions
- Seamless integration with Google Ads and Display & Video 360 for better ad targeting and campaign performance
Most importantly, tools evolve to meet changing needs, and Google Analytics 4 is no exception. While these are just a few of the improvements over the legacy version, we believe users are starting to see its advantages and benefits as well.
Let’s dive right in!
Create a GA Account and Property
Start with creating a GA account, but you may skip this step and head to Step 2 if you have an existing GA Account.
1. Click on "Admin" in the top-left corner, then select the "Create" button. Choose "Account" and follow the prompts of each step that follow. Then save your settings.
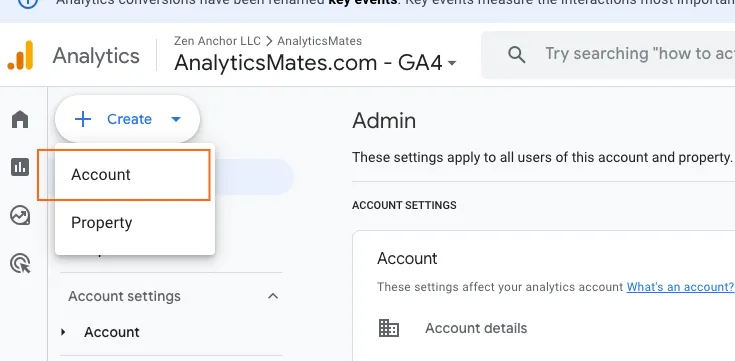
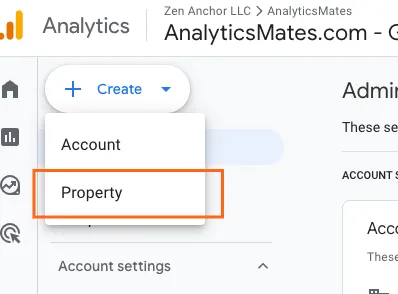
2. If you already have an account set up, you can skip this step and choose “Property” instead.
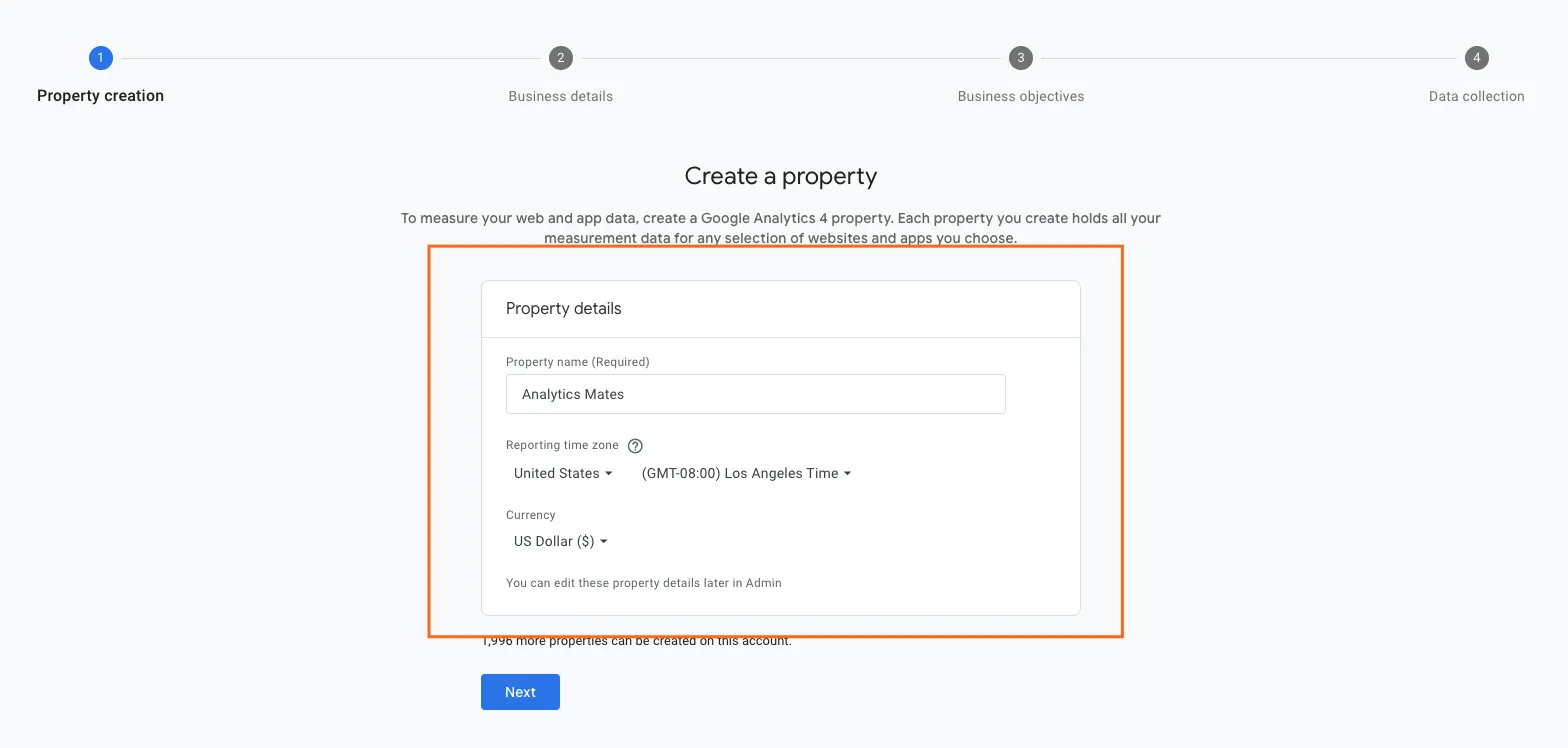
3. In the Property Settings page, enter your property name and configure the relevant settings.
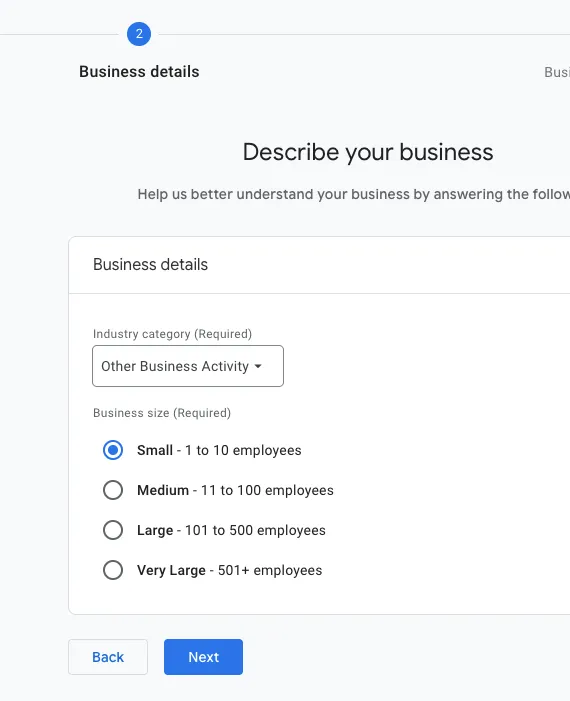
4. Step 2 asks for your business details.
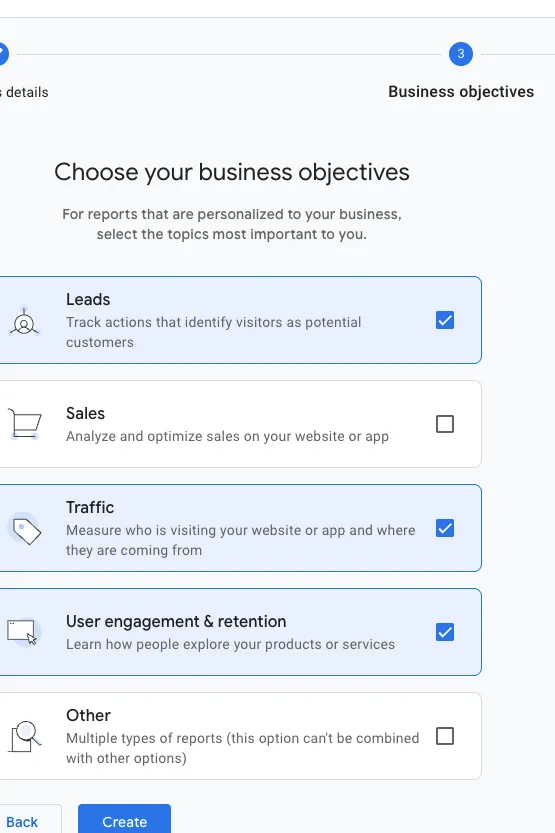
5. Step 3 asks you to specify your business objectives and what you aim to achieve by setting up this property. Then once you have decided and checked the right objectives, you can click “Create”.
6. Step 4 asks you to specify the platform from which you will collect data, whether it’s your website (Web) or an app (Android or iOS).

7. Select your platform and enter the required details in the next step. For Web, you’ll be prompted to provide your website URL and preferred data stream name. Once you’ve filled in the necessary information, click the "Create & Continue" button.

And that’s it—you’ve successfully created a new Google Analytics 4 account and property. Kudos! To ensure your property is fully optimized, be sure to check out our guide on auditing your Google Analytics 4 property here, and don’t forget to download our GA4 Audit Checklist in our Resources page.
But we are not done here yet, we need to make sure you are properly collecting data and the best way to do that is through Google Tag Manager.
Data Collection Set up Using Google Tag Manager (Recommended)
There are a few different ways to set this up in GTM. Here, we'll discuss three methods:
- Manual Setup
- Using a Content Management System (WordPress)
- Using an Event Tag
We’re assuming you already have a Google Tag Manager account and container set up. If not, be sure to check this documentation first before moving on to the next steps.
Manual Setup
Manual setup is a bit technical and you’d need to either involve your developer team or if you can do it here are the steps:
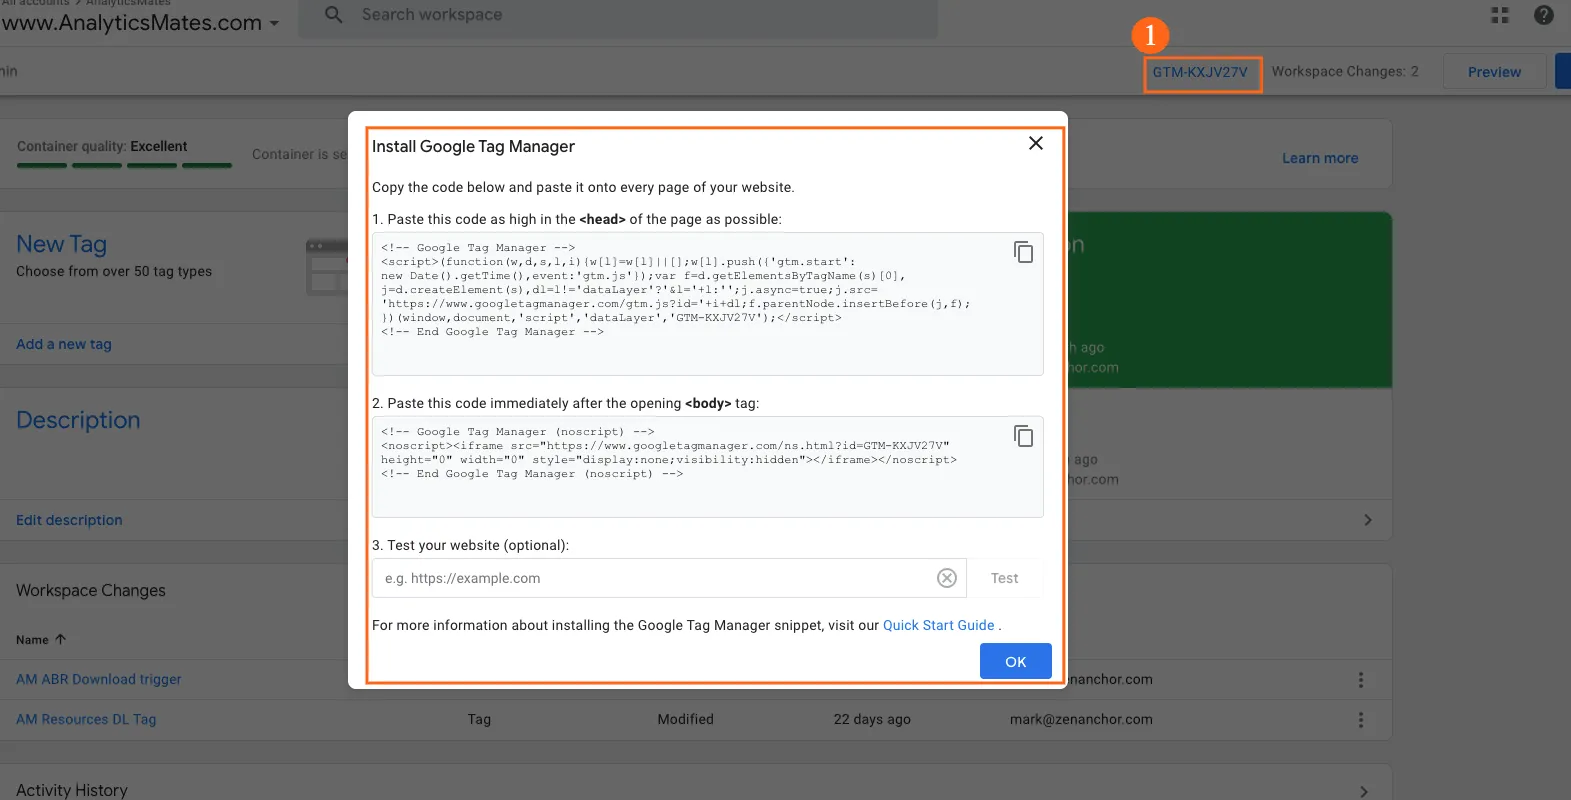
In your GTM container, go to your workspace. In the top-right corner of the page, you’ll see your GTM container ID (GTM-XXXXX). Click on it, and you’ll be prompted with instructions on how to manually install it on your website.
Using a Content Management System (WordPress)
While this may not be the most conventional method, many business owners and marketers rely on a Content Management System (CMS) for their websites. In this case, we'll walk you through the process for WordPress, which is one of the most commonly used CMS platforms. However, it's important to note that the exact steps and plugins required may vary depending on the CMS you are using. Each CMS has its own set of integration procedures and plugin requirements, so be sure to follow the specific instructions to your platform.
Here are the steps:
1. Login to your Wordpress account
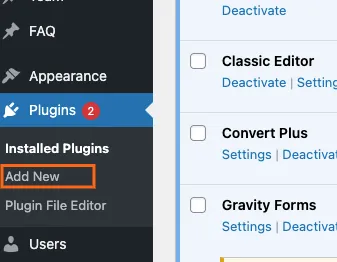
2. Go to Plugins → click Add new
3. Search for this specific plugin: Google Analytics Plugin for WordPress by GA4WP. And click “Install Now”.
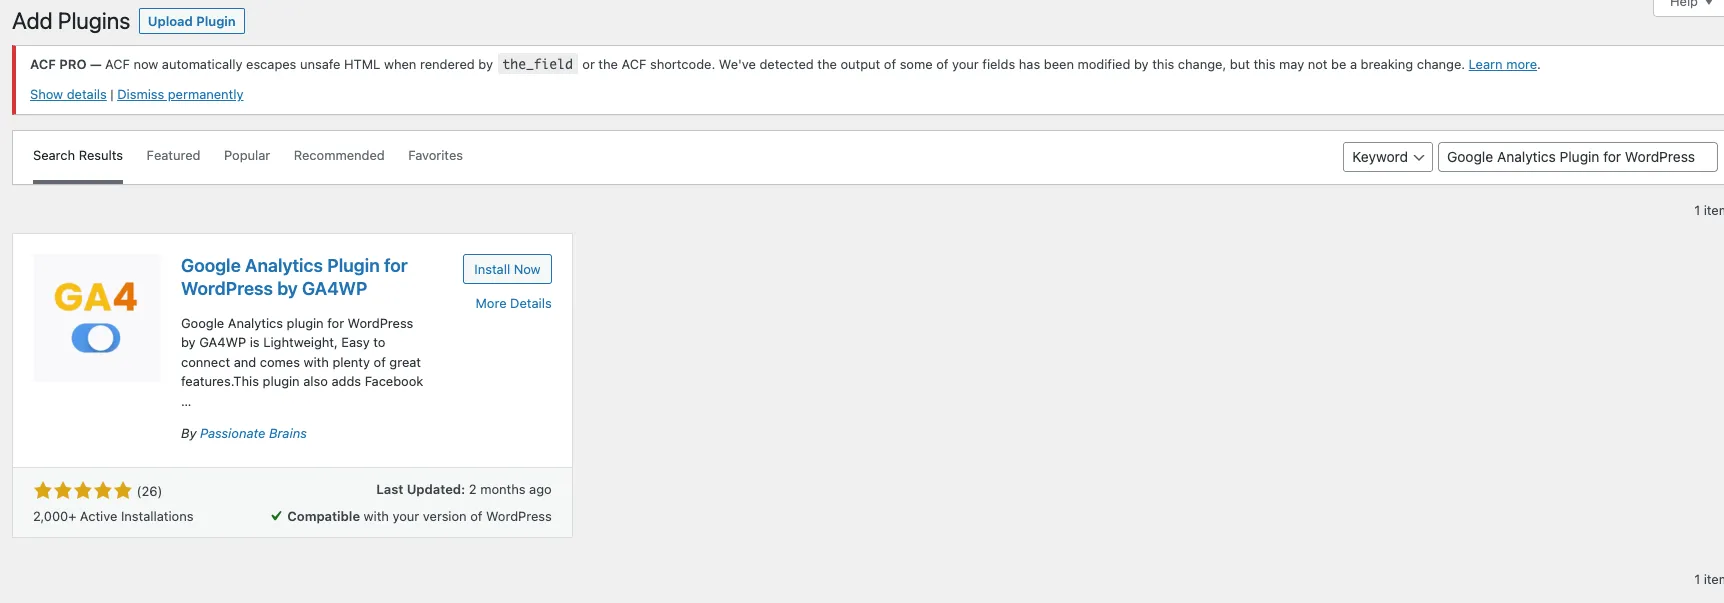
4. Once installed go to Plugins → Installed Plugins and look for the newly installed plugin – and click, Settings:

5. On this page, enter the GTM container ID (GTM-XXXXXX) and click Save.
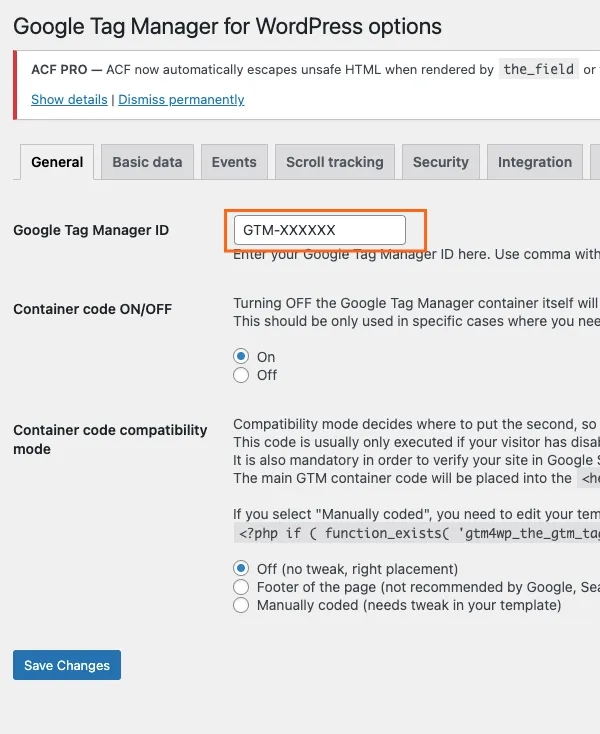
That’s it! You can explore additional features and settings if you'd like, but make sure to test your integration first. This way, if any errors occur with the setup, it will be easier to revert any changes you made.
Using an Event Tag
This is the most convenient way to do it, and we recommend it for ease of tracking all your settings in one place—Google Tag Manager (GTM). Follow these steps:
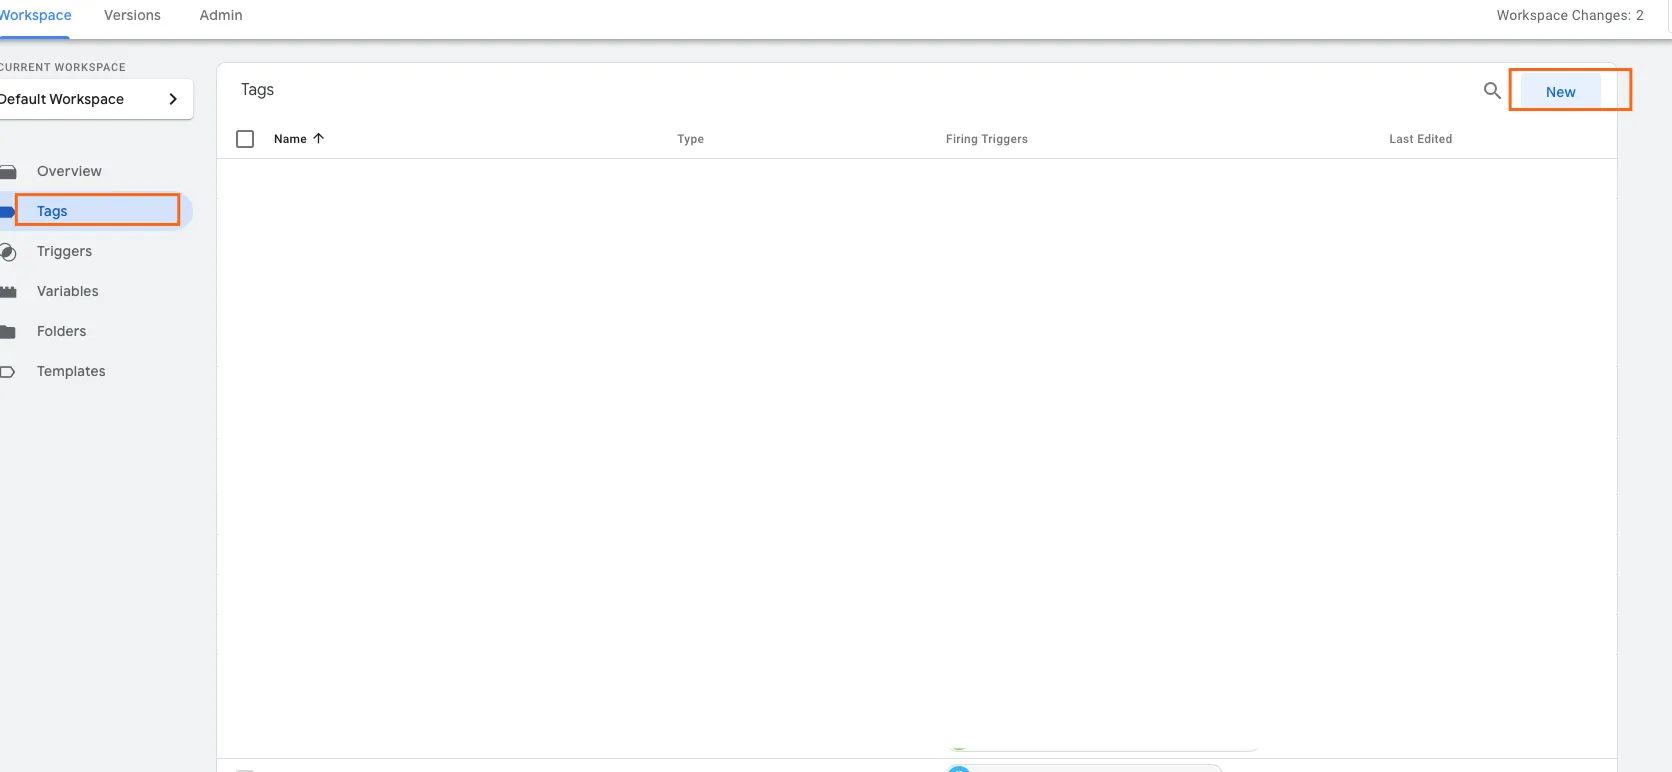
1. In your Google Tag Manager Workspace, click on Tags, then select New.
2. On the configuration page, give your tag a name (GA4 Configuration Tag), click on “Tag configuration” section → click Google Analytics.
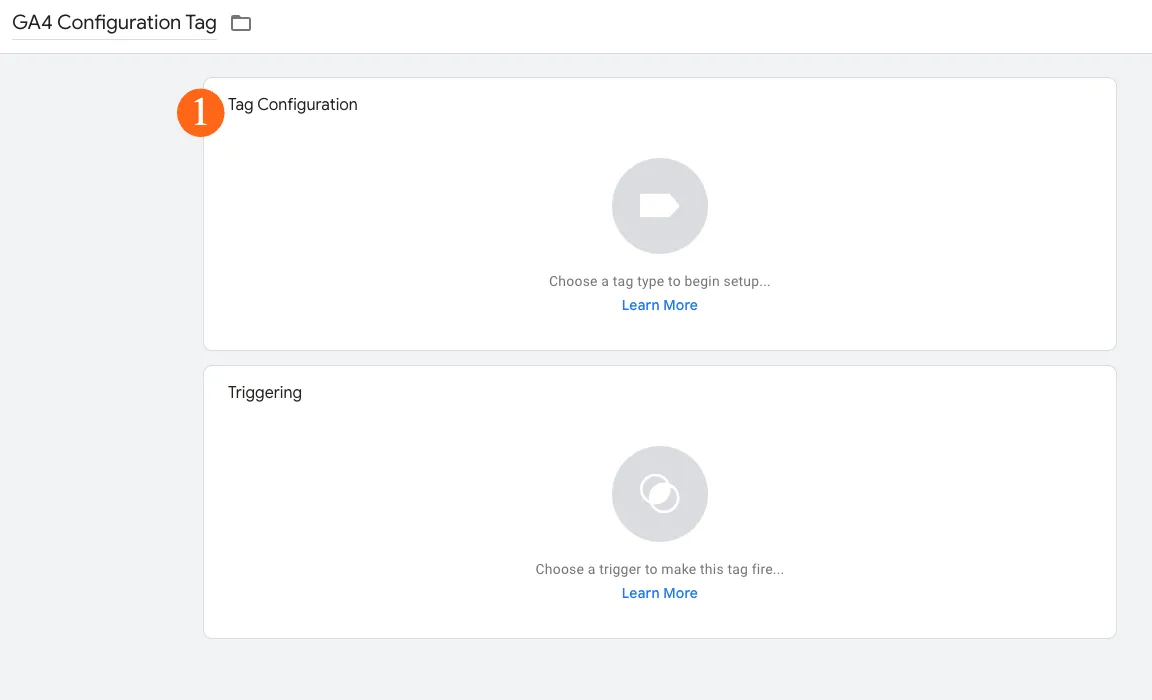
3. Under Google Tag configuration, click Google Tag.

4. Enter your GA4 Measurement ID. And click Triggering to set how you want this tag to be fired on your website.
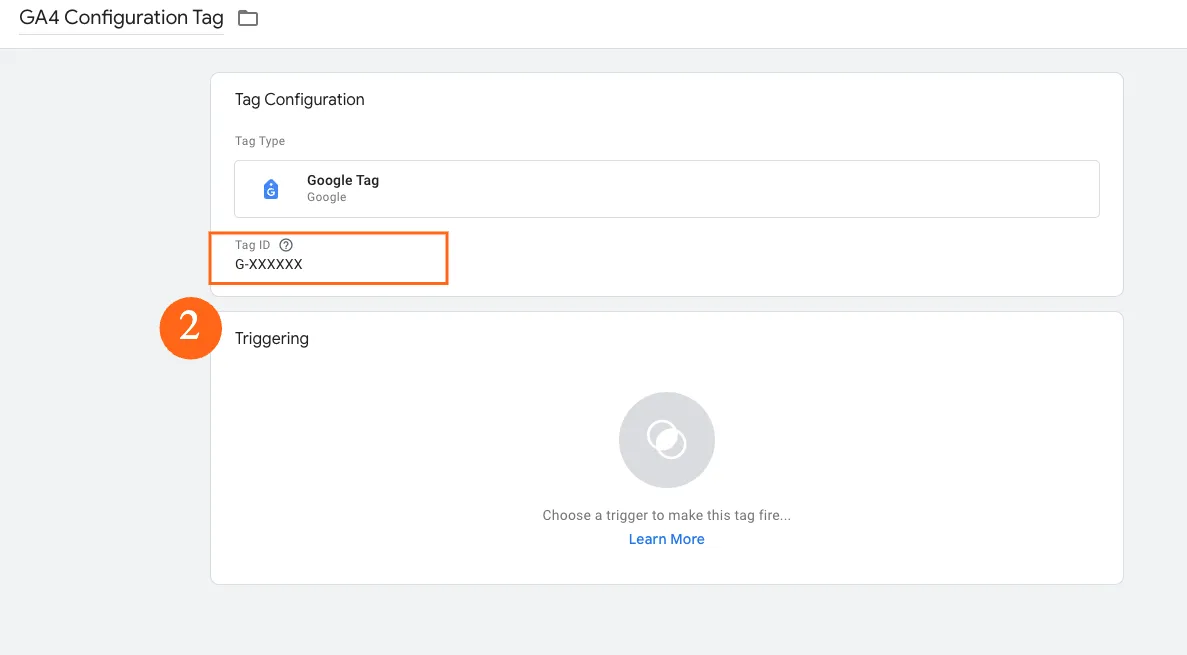
5. For the trigger, choose All Pages, type Page View.
*All Pages, type Page View" is a trigger that fires on every page load of your website. This ensures that tags (like Google Analytics) fire consistently, allowing you to track essential data like page views and URLs across your entire site.

6.Save the tag configuration.
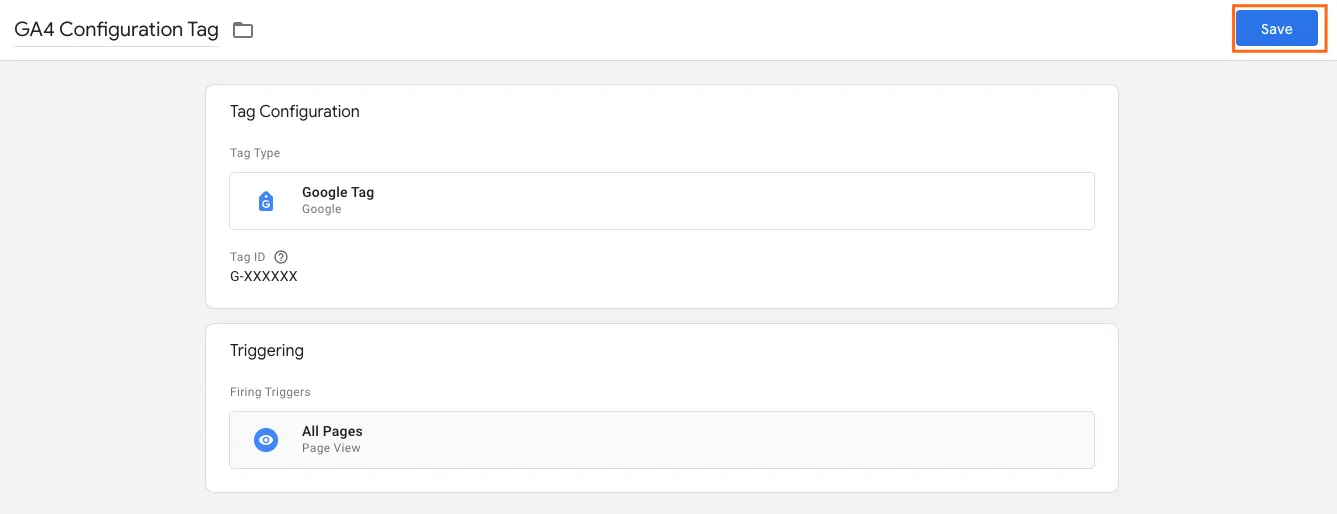
7. Preview the changes to test if the tag has been successfully created. You can find detailed instructions on how to preview, test, and debug a newly created event in GTM in one of our blog posts, here. If the tag fires when the trigger is activated, it confirms that the setup is correct.
8. Once verified, you can publish the changes to your workspace, allowing GA4 to start collecting data. Here’s a detailed step on how you can publish changes you made to your GTM container.
And that's it! With these steps completed, GA4 should now be collecting data, and you’ll soon start seeing it populate in your GA4 property. But wait, there’s more! Beyond what we’ve covered, we’d love to share some hidden gems that can help enhance the accuracy of your GA4 data collection. Discover these valuable tips in our blog post: "GA4 Fundamentals - Hidden Features to Improve Data Accuracy."
What’s Next
Now that basic traffic and user behavior data is being collected, you should start seeing this data in your GA4 reports within 48–72 hours, accounting for the standard delay in data collection and processing. While these insights are valuable, to fully maximize the potential of your Google Analytics 4 and Google Tag Manager integration, it’s time to consider implementing custom tracking.
What is custom tracking? It involves tracking specific elements on your website that are critical to understanding user behavior and interests. For example, tracking interactions with a "Book a Free Consultation" button on your website. This type of action is not tracked by default in GA4. To capture this data, you’ll need to implement custom tracking for these specific Key Events (formerly known as conversions).
For a detailed guide on setting up key events or conversion tracking in GTM, check out our blog post: GA4 GTM Event Creation Techniques
FAQs
What are the common mistakes people make when setting up GA4 for the first time?
A:Missing proper account structure, not setting up data streams correctly, or failing to test the setup.
How do I determine which business objectives to select during the GA4 setup?
A:It's based on your key performance indicators (KPIs) and business goals, such as tracking sales, user engagement, or lead generation.
Can I use Google Analytics 4 without Google Tag Manager?
A:Yes, but GTM simplifies tracking setup and provides more flexibility for managing tags and events.
What are the differences between standard GA4 events and custom events?
A:Standard events are pre-defined by Google, while custom events are created for specific user interactions not tracked by default.
What’s the best way to track offline conversions in GA4?
A: Use the Measurement Protocol to send data from offline events directly to your GA4 property.
What’s the role of enhanced measurement in GA4, and how do I configure it?
A:Enhanced measurement tracks interactions like scrolls, outbound clicks, and video engagement automatically. It can be enabled during setup or in property settings.
Final Words
As we step into 2025, it’s clear that a lot has changed since the initial rollout of Google Analytics 4. In fact, while working on this blog post, we noticed that some steps and features have evolved or are no longer available, reflecting how dynamic the platform continues to be.
While this guide covers the foundational setup, we didn’t dive into certain critical aspects, such as identifying and tracking your website’s key events. That’s because every business and industry has unique needs, and these specifics are best tailored to your goals. If you need assistance, we’re here to help—feel free to book a free consultation with us.
We hope this updated step-by-step guide empowers you to make the most of Google Analytics 4 and helps your business thrive!
We're always looking for ways to improve our Google Analytics 4 blog content. Please share your feedback so we can make it even better.
See Article Images


