


Google Analytics 4 (GA4) is a powerful tool, but to get the most out of it, you need to go beyond just tracking basic events. That’s where custom event parameters come in. They give you a more granular interpretation of your site’s performance and control over your data, allowing you to track specific user interactions that align to your business goals. Whether it’s capturing button clicks, downloading files, form submissions, or product views, custom parameters provide deeper insights that can help you make better decisions. Using Google Tag Manager (GTM) with Google Analytics 4, you can implement these custom parameters efficiently. In this blog post, we'll walk you through the process step by step, so you can confidently set up custom event parameters in GA4 using GTM.
What are Event Parameters?
Let us explain this in its simplest form:
Think of event parameters as extra details that help explain what happened when a specific action (event) took place on your website or app.
For example, if you track a "form_submission" event, you might want to know:
- Was the submission successful? (success: "yes" or "no")
- What page was the form submitted on? (page_location: "contact_us")
- What type of form was submitted?(form_type: "newsletter_signup")
- What resource has been downloaded? (Looker Dashboard, AI prompt)
Each of these details is stored as a key-value pair, meaning:
- Key = the type of information being tracked (e.g., "success")
- Value = the specific detail for that event (e.g., "yes")
Key Considerations Before Setting Up Event Parameters
Understand the difference between default (automatically collected) events and custom events. Since we won’t be diving into the details of creating custom events here, you can check out this list of our recent posts on custom events, for further guidance.
- GA4 GTM Event Creation Techniques
- How to Set Up Key Events (Conversions) in GA4 and Avoid Costly Mistakes
Aside from this, you'll need the right tools—primarily Google Analytics 4 (GA4) and Google Tag Manager (GTM). Google Looker Studio may also be useful for reporting, but for now, we’ll focus on GA4 and GTM.
Implementation
What's a better way to explain this, but through an example. We’re working on collecting additional event parameters for our forms in our Resources page.
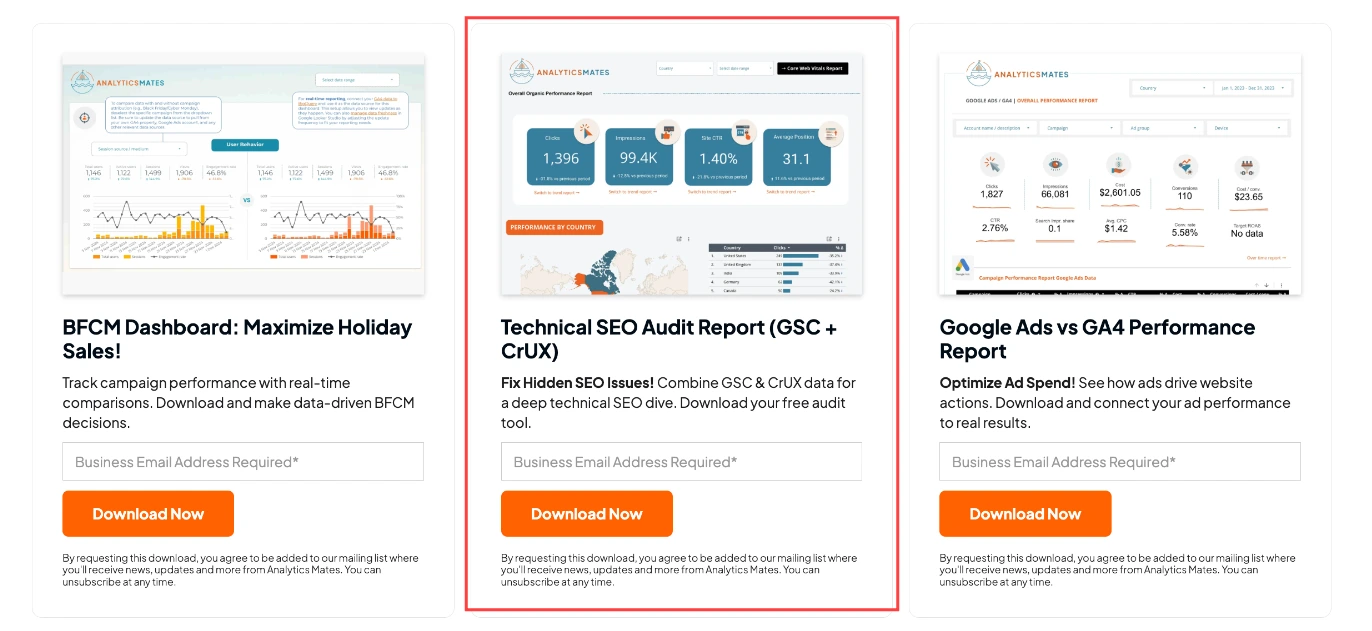
What we’re trying to do here is to capture additional details about which specific resources are being downloaded. On our website right now, we offer a variety of free downloadable resources, but we only require users to sign up for our newsletter—without tracking which resources they access.
You might be wondering, why not assign separate events for each downloadable resource? While that’s possible, it can lead to a cluttered and inefficient setup—something we want to avoid. Instead, let’s explore a more streamlined approach.
Step 1: Check the elements you need and will use for the event
1. Log in to your Google Tag Manager (GTM) account and open the container.
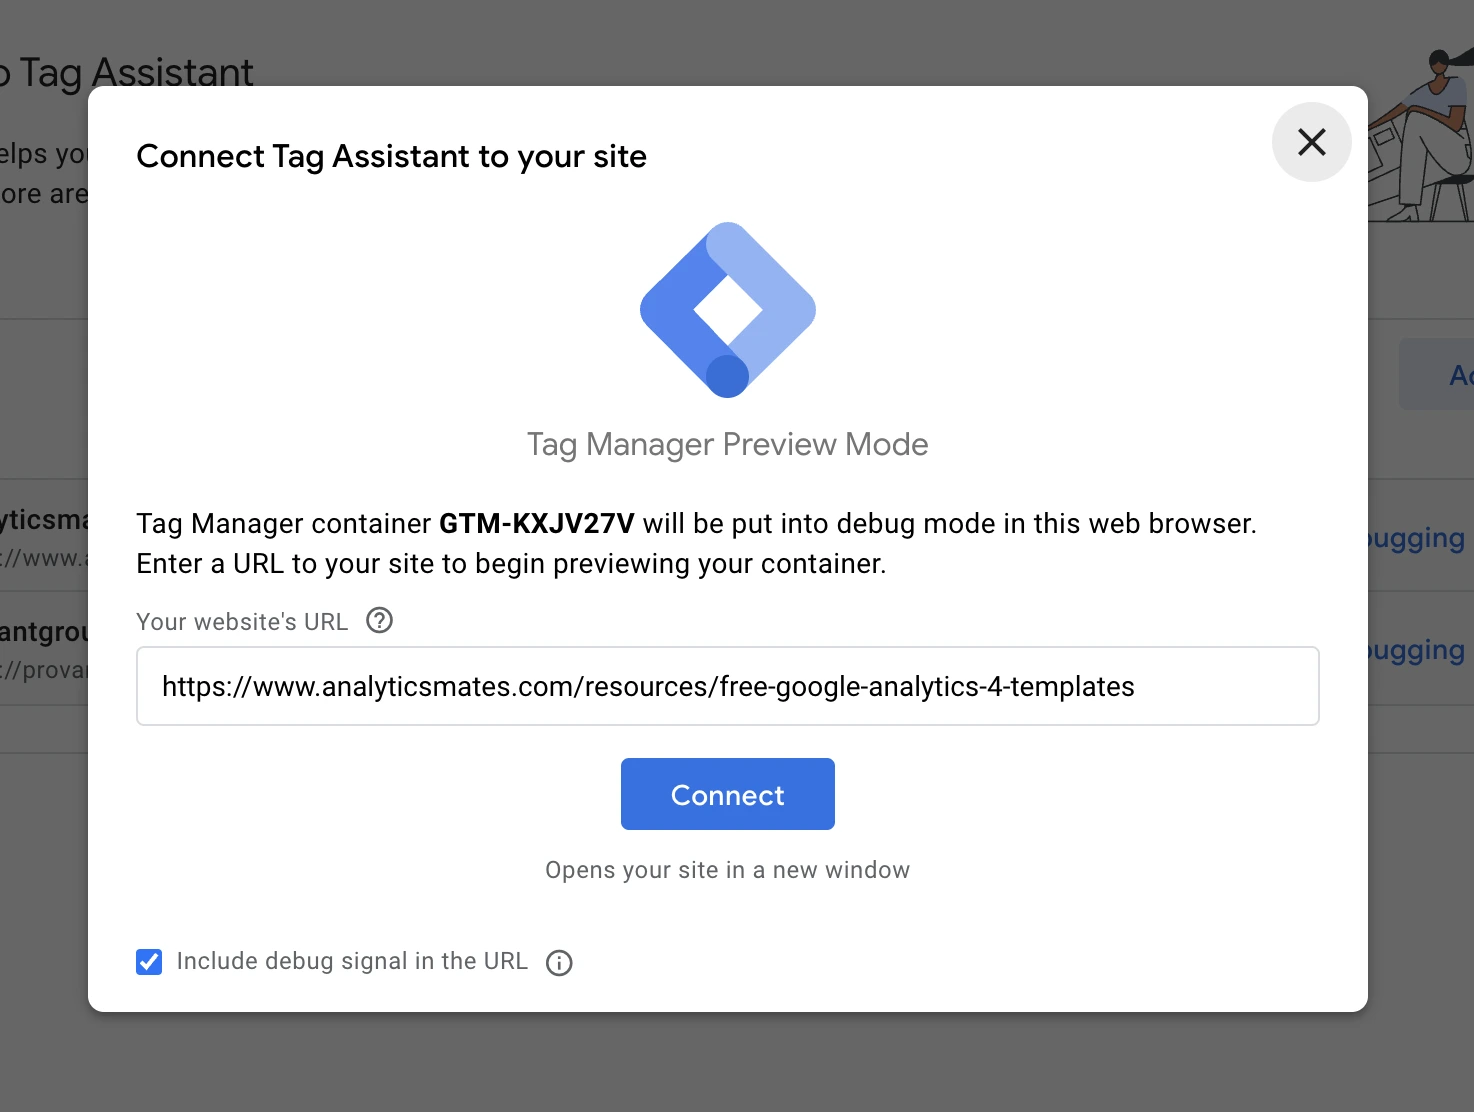
2.Click the Preview button,

then enter the website URL where the event requiring the custom event parameter is located.
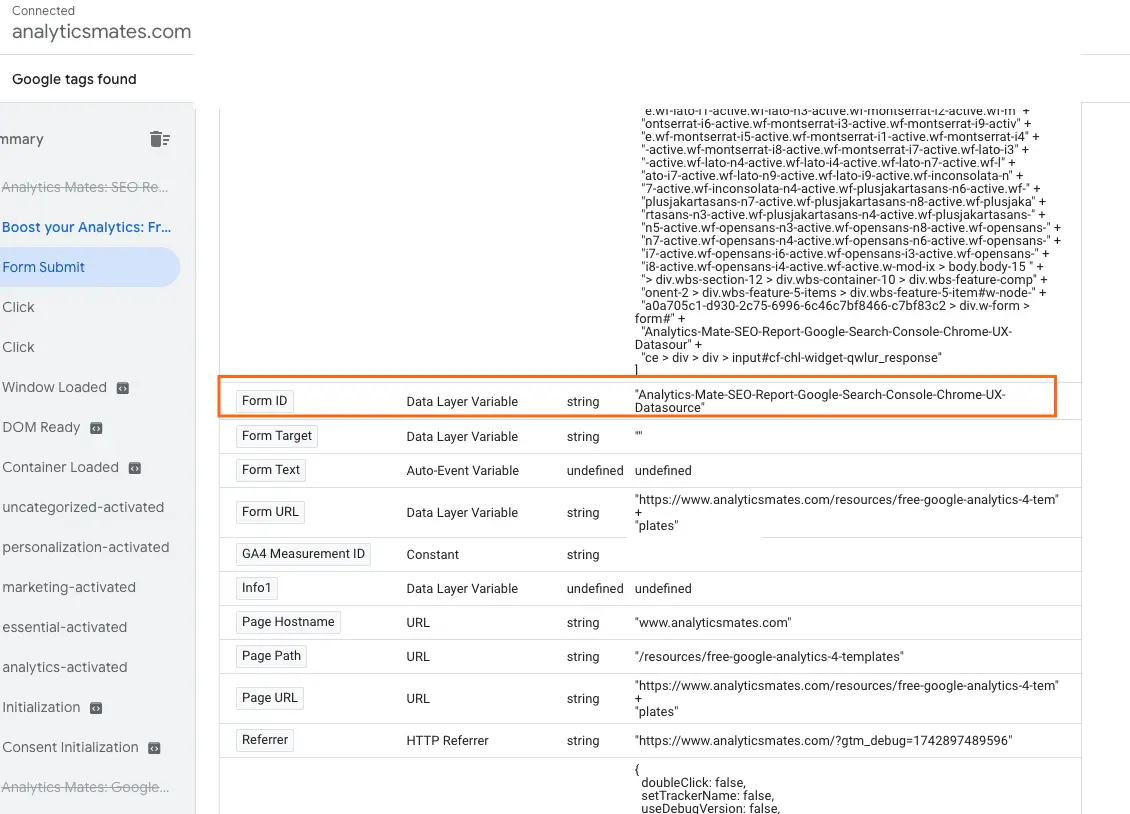
4. We'll test this form to identify the data layer values or elements we can use for tracking.

5. Go to Tag Assistant and identify the values available for the event parameter. In this example, the “Form ID” can be used as it has a unique value that sets it apart from other events. This helps ensure accurate data collection and prevents tracking inconsistencies.
Step 2: GTM Tag and Trigger implementation
6. Now that we’ve identified the value using the Form ID, we can set up the GTM tag (if you haven’t created one yet).In our case, we created a single tag for all downloads and simply added triggers based on the specific resource being downloaded. Click on the tag.
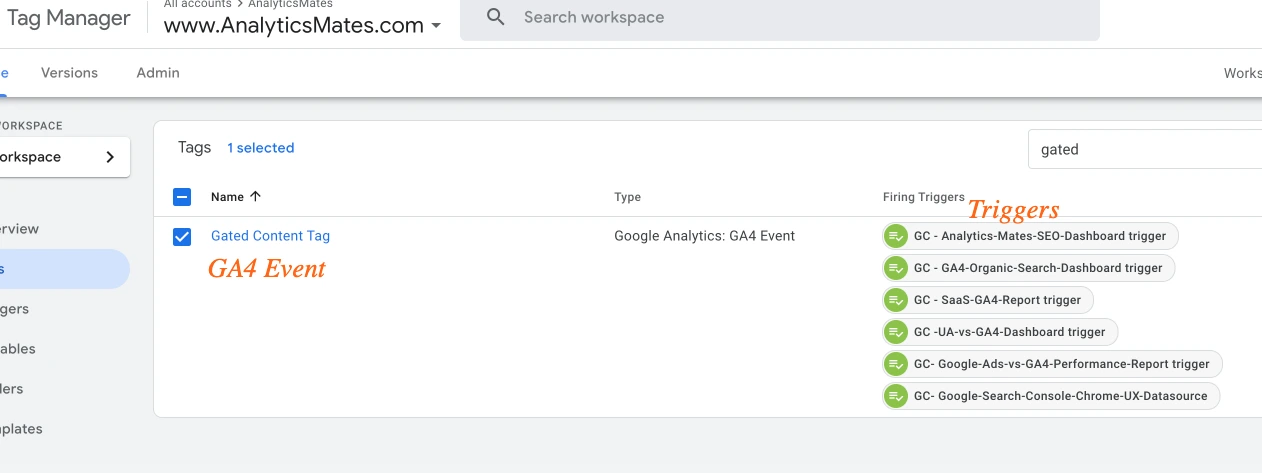
On the Tag Configuration page, click the pencil icon.
7. Next, click the “+” icon to create a new trigger. On the Choose Trigger page, click the “+” icon in the top-right corner.

8. On the next page, select a trigger type based on your site’s tracking setup. In this example, we’re using Form Submission, so we’ll choose that option.
9. Give your trigger a distinct name, such as "Technical SEO Audit Report (GSC + CrUX)".
10. Under This trigger fires on, select Some Forms and use the Form ID condition: Use the Form ID (contains “Analytics-Mate-SEO-Report-Google-Search-Console-Chrome-UX-Datasource”)
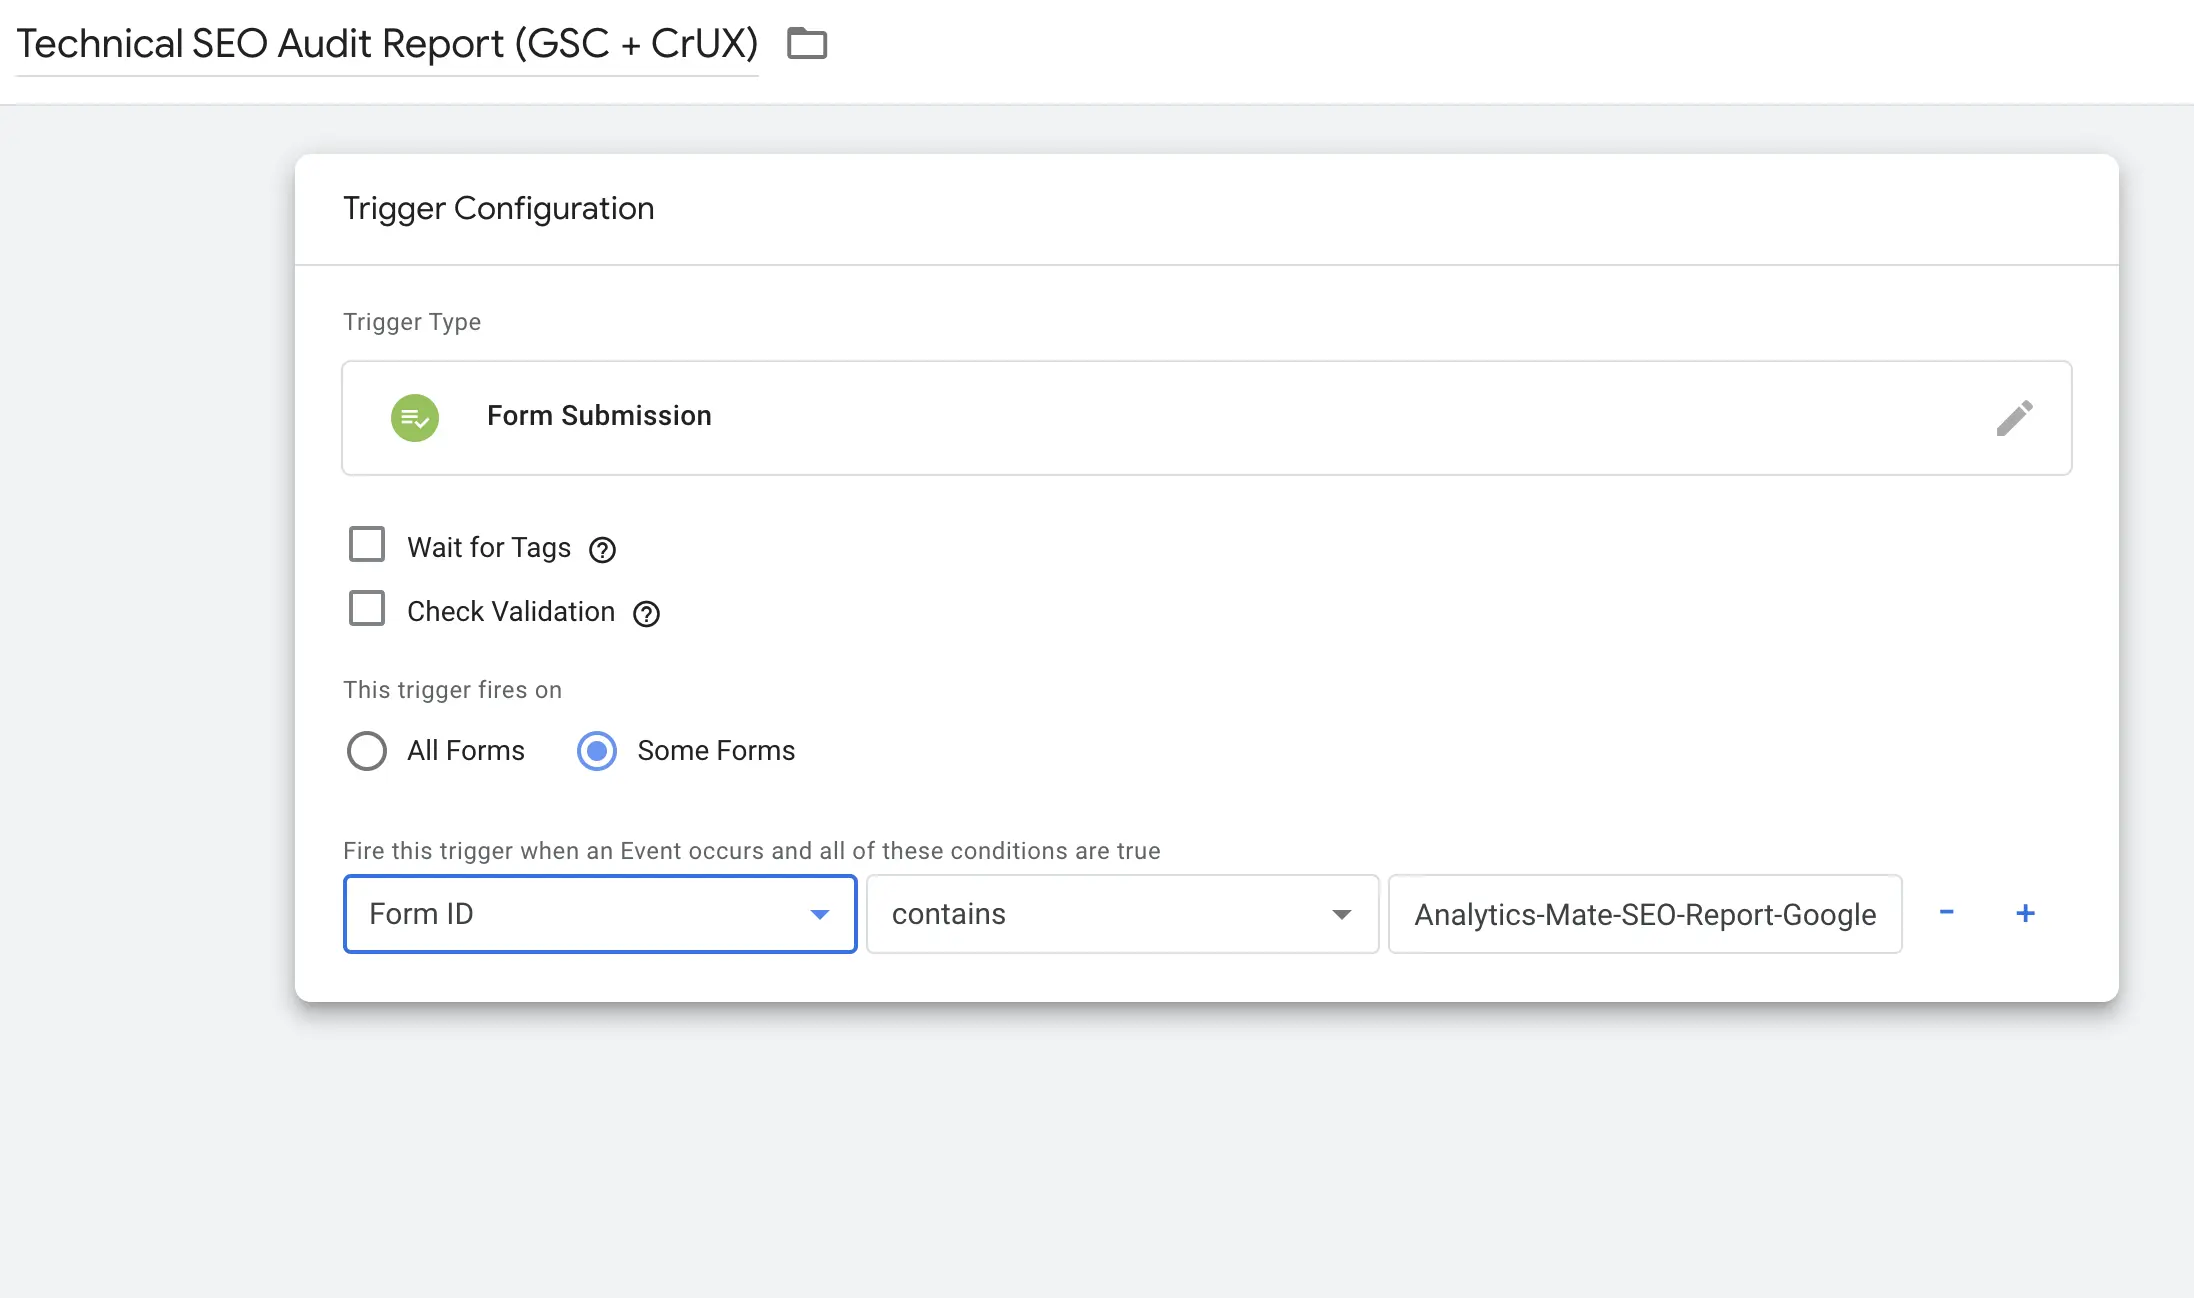
11. Once done, click Save.
Step 3: Setting up the Event Parameter
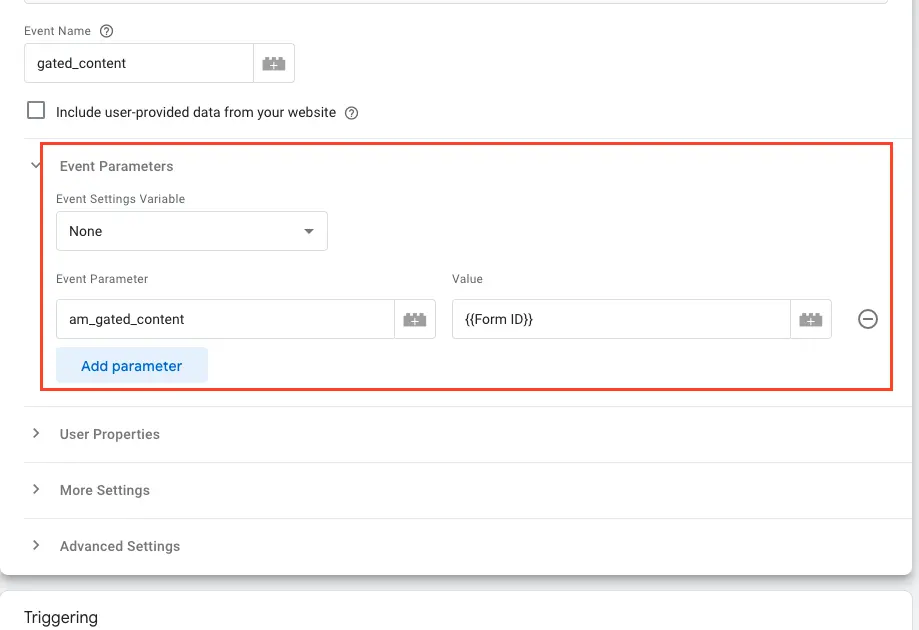
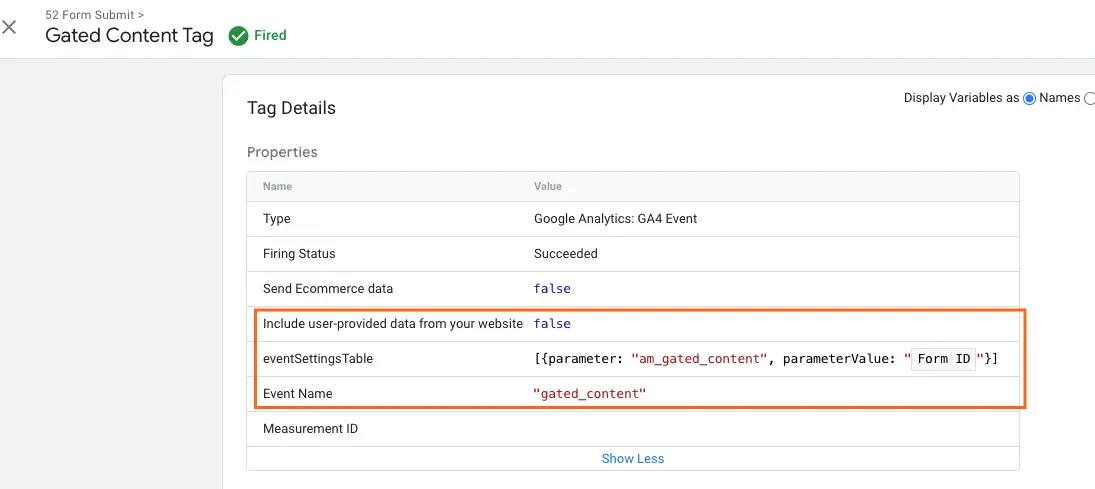
12. Return to the Tag Configuration section and click on the Event Parameters section.
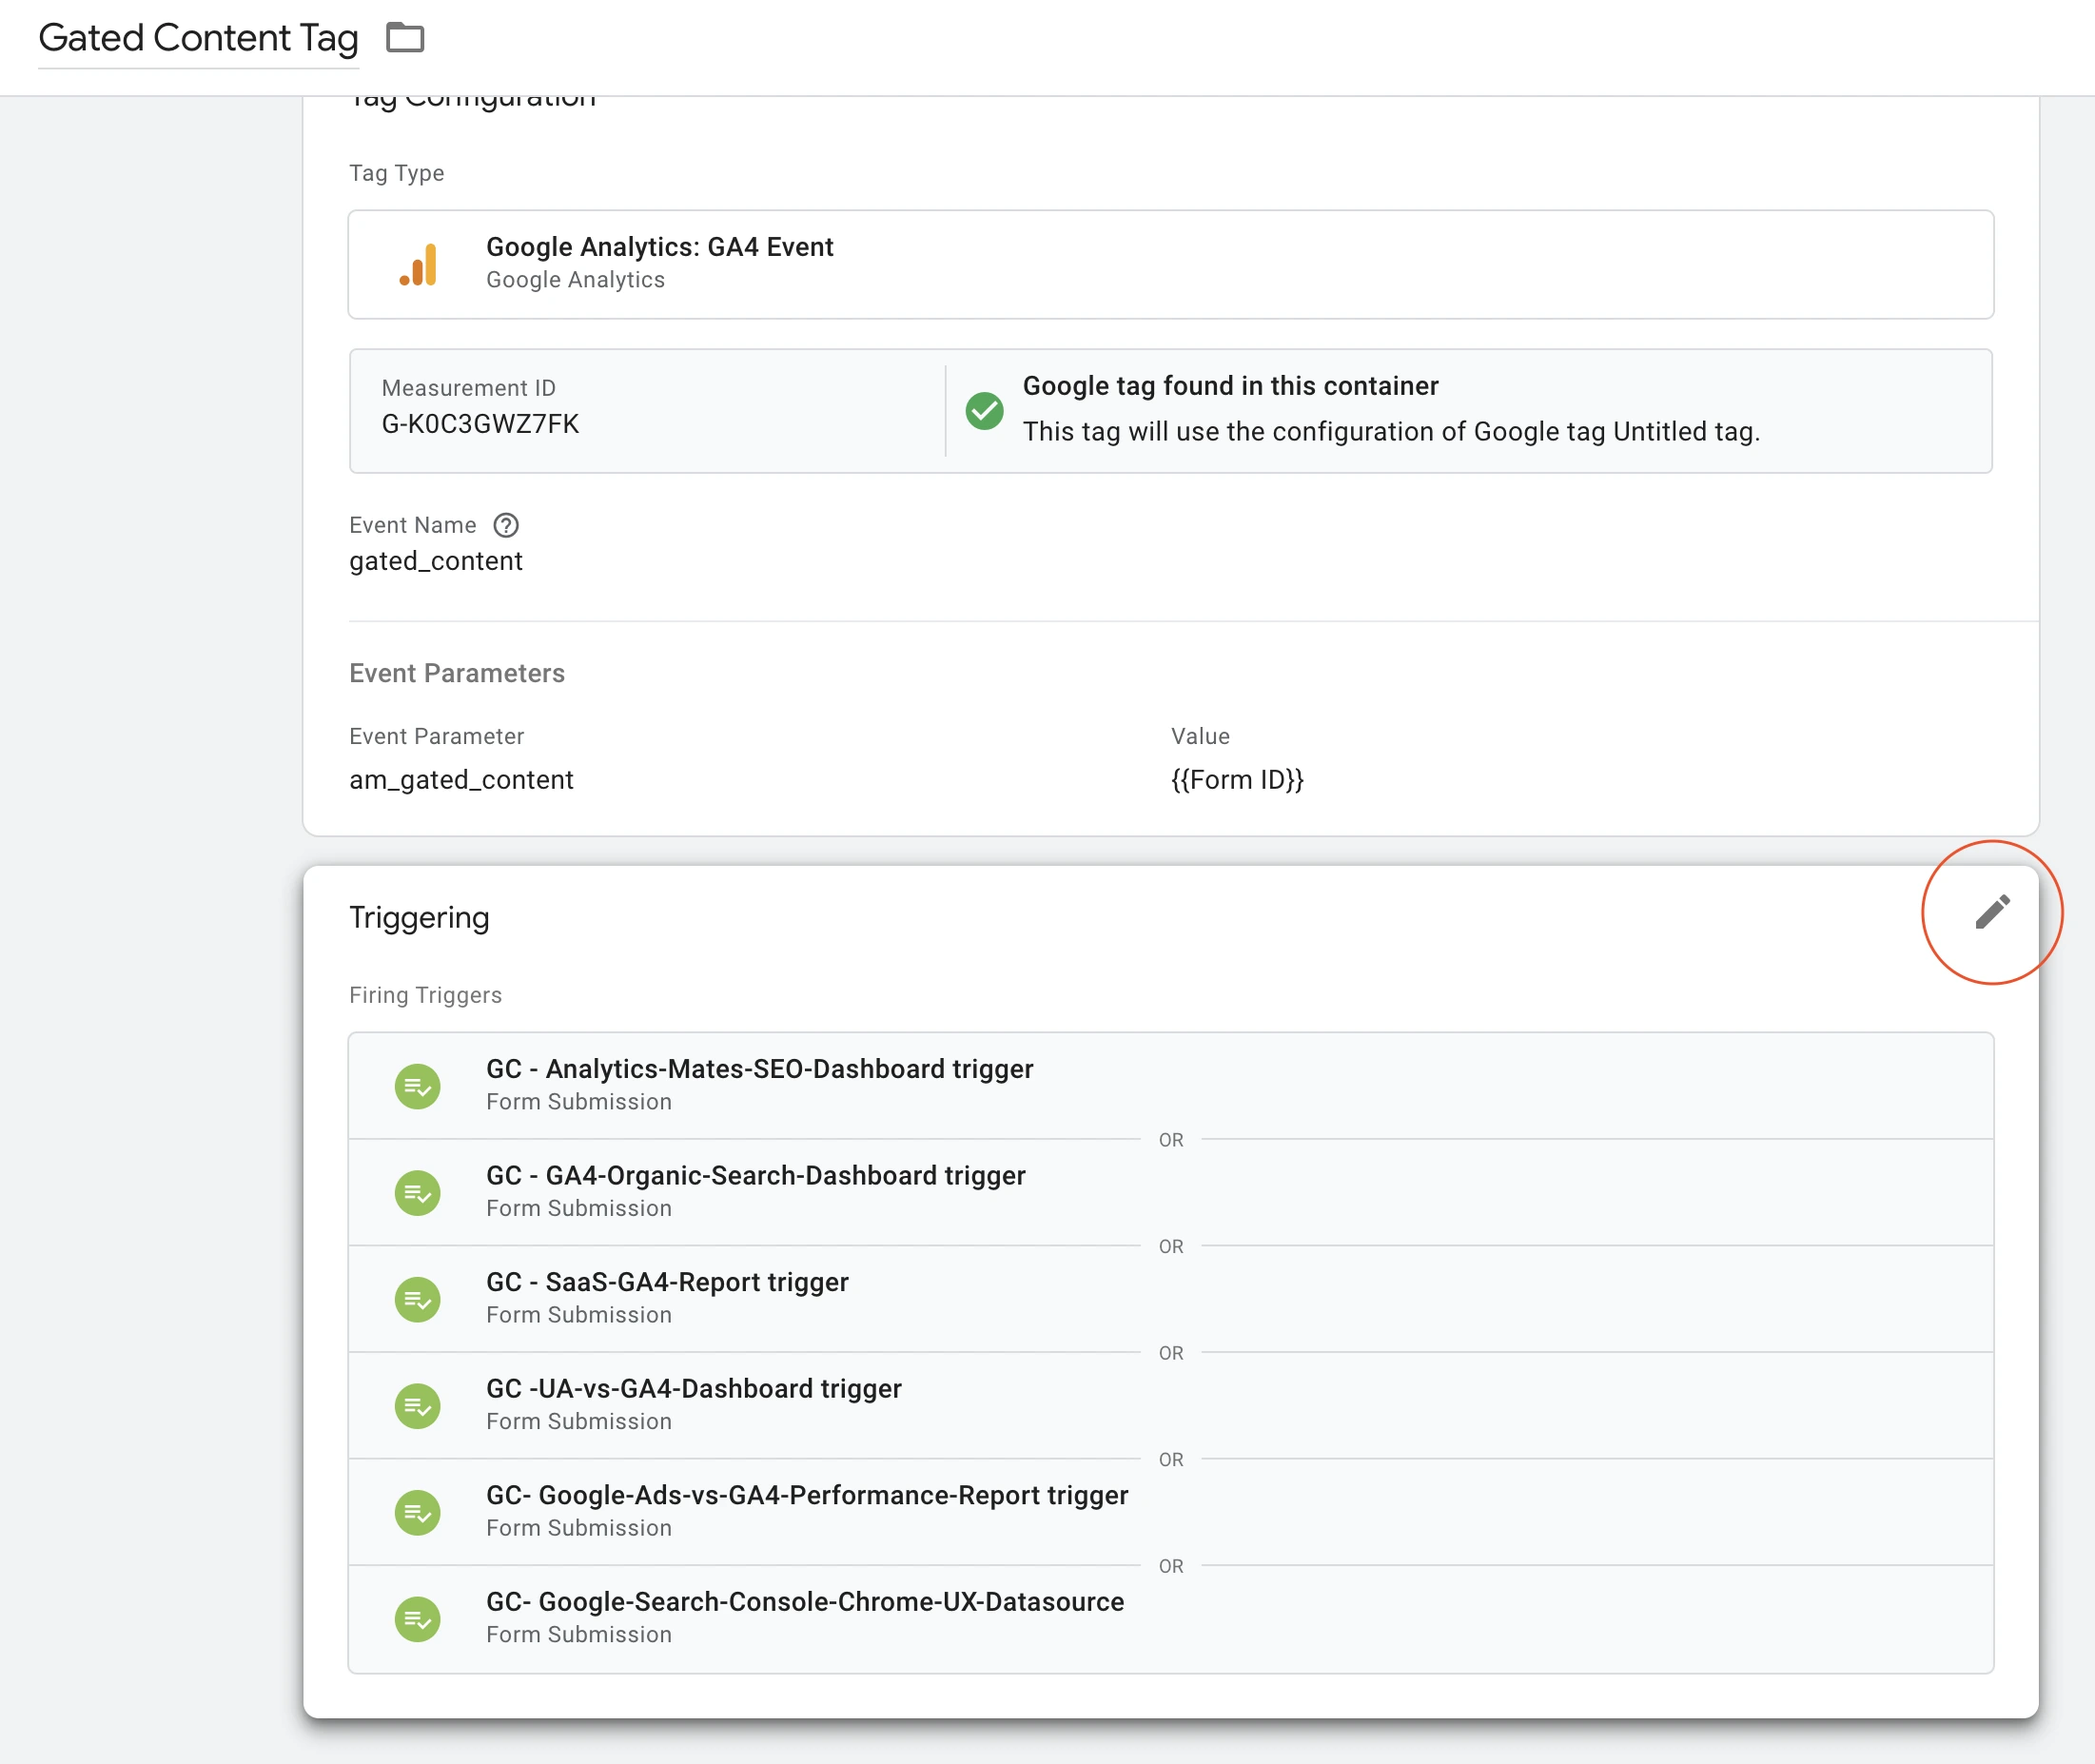
13. In this example (as shown in the screenshot below), we are passing the value of "gated_content" to GA4. Additionally, we are passing event parameters each time this event is triggered.
14. Pay close attention to the Event Parameter and Value fields. Ensure you enter a name for the event parameter, and for the value, dynamically pass the Form ID. The correct syntax for this is {} (curly braces).
Step 4: Preview, Testing and DebugView
15. Once everything is set up, it's important to test whether the event parameter is being passed to GA4. Click the Preview button in Google Tag Manager.
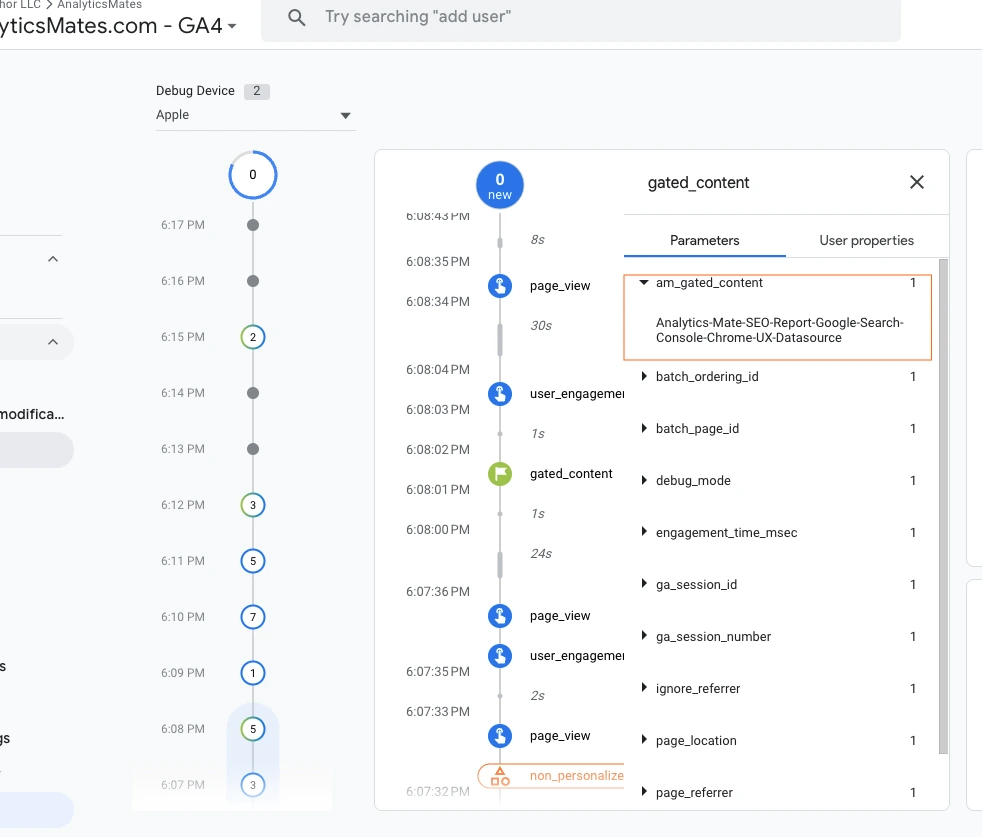
16. Navigate to the resource and attempt to download it.
17. In the Tag Assistant section, confirm that the tag has successfully fired and check if the event parameter is included.
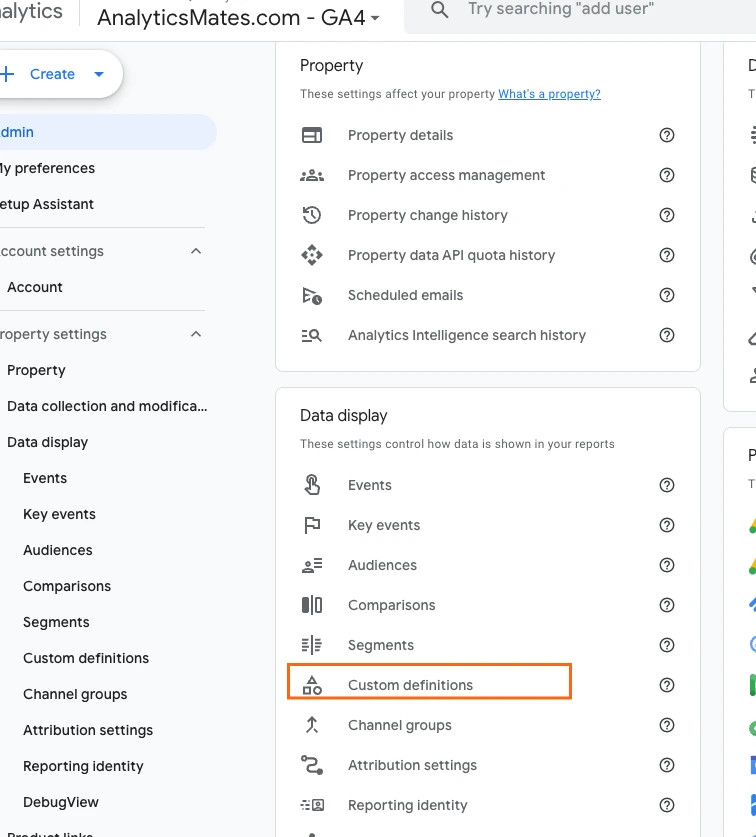
18. In GA4, go to Admin > Data Display > DebugView to verify that the event parameter is being recorded.
Step 5: Mapping Event Parameter in GA4
To catch the event parameter value from GTM, you need to create a custom dimension.
19. In GA4, navigate to Admin > Data Display > Custom Definitions.
20. Click the Create Custom Dimension button.
21. Enter the event parameter name exactly as it was set up in GTM. This step is crucial—if the names do not match, the value will not be recorded properly. In this example, we used am_gated_content as the event parameter name.
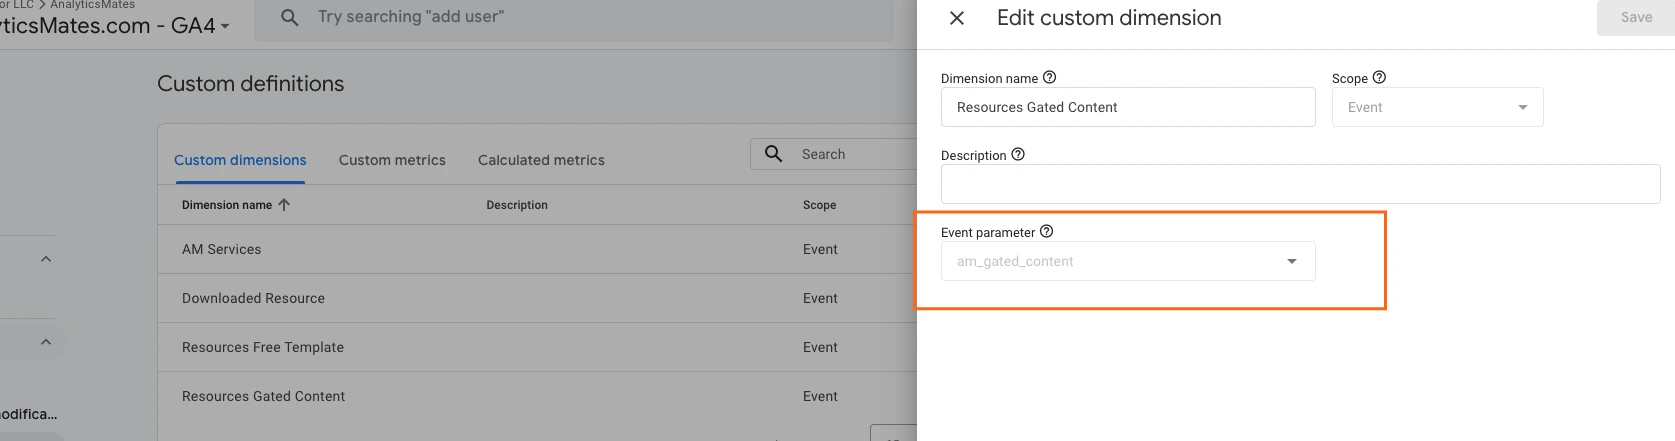
22. Click Save.
Note: It may take 48-72 hours before data starts appearing in your GA4 reports.
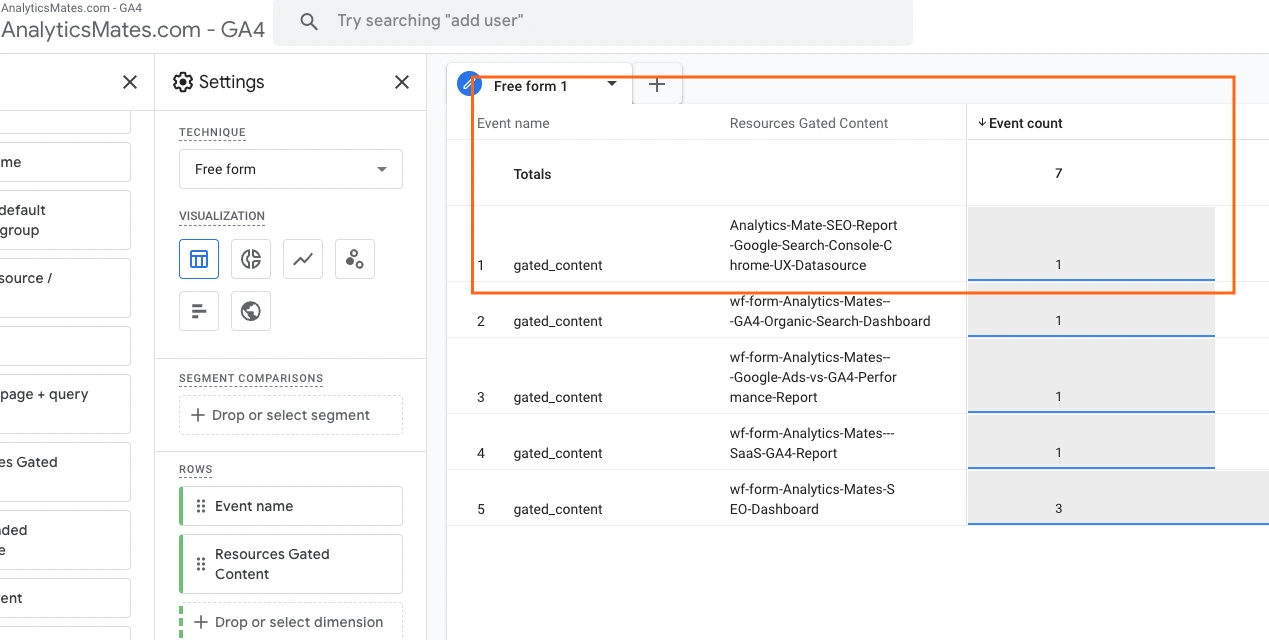
Step 6: Validating Event Parameter Data in Exploration Report
The final step is to verify that the data is being collected correctly using an Exploration Report in GA4.
23. In GA4, navigate to Explore > Exploration Report.
24. Add the following to your report:
- Event Name
- The Custom Dimension you recently created (e.g., Resources Gated Content).
25. Apply a filter to display only the relevant event name.
Best Practices for Custom Event Tracking
- Use a Clear and Consistent Naming Convention – Follow GA4’s recommended event naming structure (e.g., snake_case).
- Define Key Event Parameters – Identify which custom parameters are necessary for deeper analysis.
- Leverage Built-in Variables in GTM – Use GTM’s built-in variables to capture dynamic data without extra coding.
- Enable DebugView in GA4 – Test custom events in real-time using DebugView before deployment.
- Use Google Tag Assistant and Preview Mode – Ensure events fire correctly before publishing changes in GTM.
- Keep Events Aligned with Business Goals – Track actions that provide meaningful insights for decision-making.
- Follow GA4’s Recommended Events When Possible – Use predefined events like purchase, sign_up, and add_to_cart where applicable.
- Minimize Redundant Event Tracking – Avoid tracking unnecessary or duplicate events that can clutter reports.
- Ensure Custom Parameters Are Registered in GA4 – Add parameters under the ‘Custom Definitions’ section for proper reporting.
- Test Across Different Devices and Browsers – Ensure custom event tracking works consistently across all user environments.
Common Mistakes to Avoid
- Not Naming Events Correctly – Avoid using spaces, special characters, or inconsistent casing in event names.
- Forgetting to Configure Custom Parameters in GA4 – If parameters aren’t registered in GA4, they won’t appear in reports.
- Not Using Preview Mode in GTM – Deploying changes without testing can lead to inaccurate or missing data.
- Tracking Too Many Unnecessary Events – Overloading GA4 with unnecessary data makes reporting harder to analyze.
- Not Mapping Variables Correctly in GTM – Using incorrect or missing variables can cause events to fail.
- Sending Personally Identifiable Information (PII) – Avoid capturing email addresses, phone numbers, or other PII, as it violates Google’s policies.
- Ignoring Data Layer Setup Issues – Ensure the Data Layer is structured correctly for custom event parameters to fire properly.
- Not Using Consistent Event Names Across Platforms – Ensure event names are standardized across GA4, GTM, and other tools.
- Missing Event Timing Issues – Events that fire too late or too early may not be recorded properly.
- Not Regularly Auditing Event Tracking – Failing to check GA4 reports and debug errors can lead to broken tracking over time.
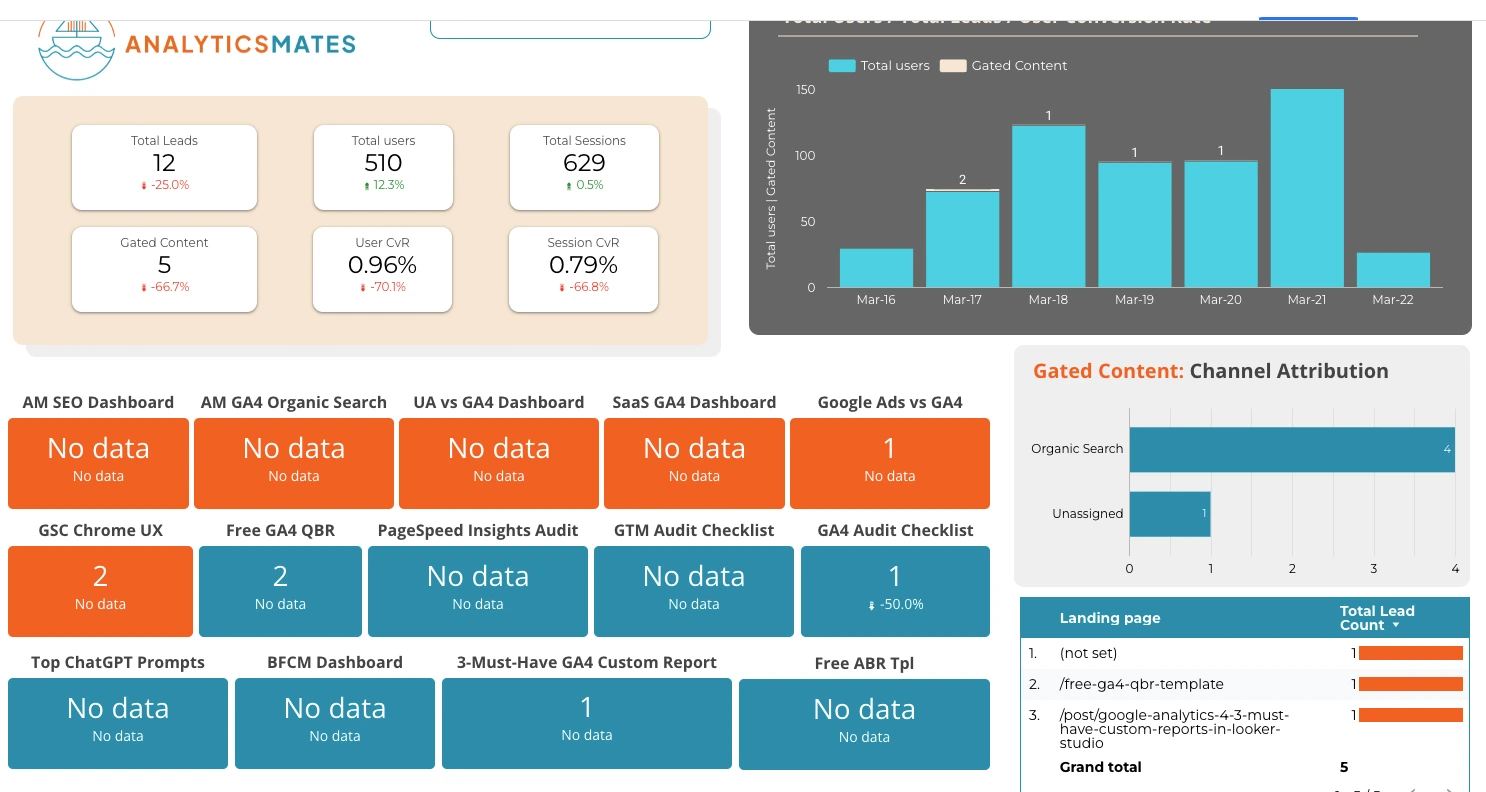
The Practical Use of Event Parameters
At Analytics Mates, we’re all about making data-driven decisions that maximize impact. By tracking event parameters, we gain clear insights into how many downloads occur over time and which content resonates most with our audience. These insights empower us to refine our strategy, create high-value resources, and continuously adapt to the evolving needs of marketing professionals. Take a look at this snapshot of our dashboard in action!
Final Words
Setting up custom event parameters in GA4 with GTM might seem tricky at first, but it’s a game-changer for understanding user behavior. By tracking specific interactions like form submissions and downloads, you get richer insights that help you make smarter decisions. Just remember to test, validate, and keep your tracking aligned with your goals—and before you know it, you’ll have a streamlined analytics setup that truly works for you. Now, go put it into action!
Thank you for reading!
We're always looking for ways to improve our Google Analytics 4 blog content. Please share your feedback so we can make it even better.
See Article Images


